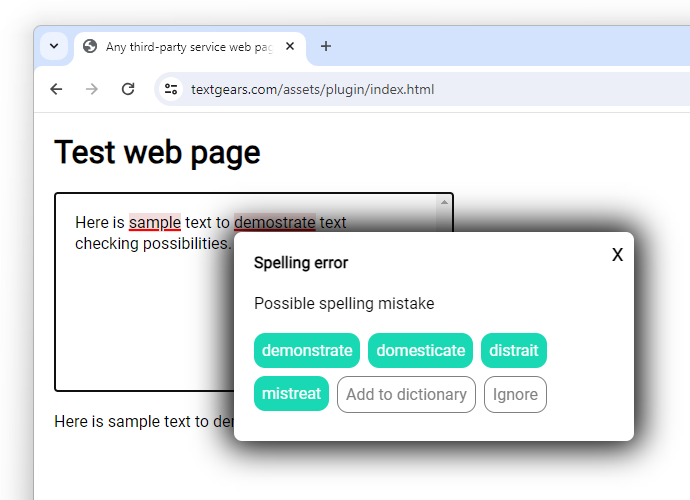
Plug-in per il controllo ortografico del sito web

Demo online: https://textgears.com/assets/plugin/index.html
Questa documentazione descrive il modo di integrare un semplice meccanismo di controllo del testo in qualsiasi pagina web.
Requisiti della pagina del sito web
La versione attuale del plugin può allegare il controllo del testo a qualsiasi elemento della pagina tranne <textarea />.
Quindi se usi <textarea />, dovresti sostituirlo con a
<div> stile come elemento di input di testo.
Esempio HTML:
<style>
    /* Styling ot text editor block */
    .textgears-editor {
        display: inline-block;
        white-space: break-spaces;
        line-height: 1.3;
        width: 100%;
        max-width: 400px;
        height: 300px;
        box-sizing: border-box;
        padding: 20px;
        overflow-y: scroll;
        border: 1px solid black;
    }
</style>

<!-- Any styled element to be used as text editor -->
<div class="textgears-editor" placeholder="Enter your text here">Here is sample text to demostrate text checking possibilities.</div>
Allegare un plugin
Per allegare un plugin all'elemento <div> menzionato sopra, basta aggiungere questo codice:
<!-- Init plugin, can be put on page body or inside a head block -->
<script type="text/javascript" src="https://textgears.com/assets/plugin/plugin.js"></script>
<link rel="stylesheet" href="https://textgears.com/assets/plugin/plugin.css"/>

<!-- Can be placed on page or can be run on init script or in any other place -->
<script type="text/javascript">
    var textCheckingPlugin = new TextGearsPlugin({
        // API endpoint
        endpoint: "https://api.textgears.com",
        // Place your key here
        key: "DEMO_KEY",
        // Text language
        language: "en-US",
        // Dictionary ids to be loaded on text checking. Can be empty to use default dictionary.
        // In this example you can see two dictionaries:
        // The first one is common for all of your users and can be edited with our API.
        // The second one contains words for a single user only.
        checkDictionaryIds: ["common", "user123"],
        // Dictionary to be edited on "Add to dictionary".
        // Set null to use default dictionary only or set any string value. For example, active user id.
        // You do not need to explicitly create a new dictionary for each user if you need.
        // Adding a word to a non-existing dictionary creates one automatically.
        editDictionaryId: "user123",
        // DOM elements to be handled
        editors: document.getElementsByClassName("textgears-editor"),
        // editors: [document.getElementById('textgears-editor')],
        // Timeout between the pause of input and text checking request
        timeout: 1500,
        // Set custom cascading style classes for
        theme: {
            suggestionButtonClass: "suggestion-button",
            suggestionRemoveButtonClass: "suggestion-button suggestion-remove",
            addToDictionaryButtonClass: "suggestion-button add-to-dictionary-button",
        },
        // Start checking on init
        checkOnLoadIfNotEmpty: true,
        // Sample text changing event callback
        onTextChange: function (event) {
            document.getElementById("callback-test").innerHTML = event.text;
            // Or set input value if you have a form like this:
            // <form name="comment-form"><input type="hidden" name="comment"/></form></span>
            document.forms["comment-form"]["comment"].value = event.text;
        }
    });
</script>
Per ottenere un valore dell'editor di testo utilizza l'evento onTextChange o un codice come questo:
let value = document.getElementsByClassName("textgears-editor")[0].innerText || "";
Nelle versioni successive del plugin verrà fornito il supporto per <textarea/>.
Stili personalizzati
Come puoi vedere sopra, il plugin viene fornito con il proprio file di fogli di stile a cascata. Sentiti libero di copiarlo e modificare gli stili in base ai tuoi scopi.